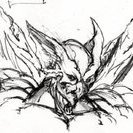
dobu gabu maru Posted August 7, 2017 Think. That's probably the most obvious yet essential important tip. Every object you place into Doom has pros and cons attached to it, which vary in intensity depending on what has come before it. Each enemy has a role to fulfill and any munitions given can potentially change the tide of battle. You can haphazardly plop stuff down into a map if you so desire, but thinking about the way each thing pushes and pulls the combat is required learning if you wish to stand with the Dooming greats. I'm going to use an example from a map I worked on (Revilution MAP22), not as a way to boast but because I'm most familiar with my own work. Huge wall o' text ahead: Spoiler So this area was loosely designed by kyka, and there was no battle attached to it when I received the map for editing purposes. I thought it looked cool so I made it the final arena, but I had an obvious problem: what enemies do I put here? What weapons? What health? The structure hovers over 20% damaging lava, offering only a few pillars at the corners for protection. At the north end of the area is the den where all the monsters are holed up, with an exit the player can jump into at any time. I decided to ultimately split this battle into two halves: the pre-final fight (#1, blue), and the final fight (#2, orange). An important thing to keep in mind (if the player pistol started) is that they enter this battle wielding the shotgun, chaingun, and rocket launcher, but they could've also found the optional SSG, plasma gun, and even the BFG—it's important to account for all possible variables while designing a map. For the first battle, we have the player pick up an unavoidable megasphere and run over a platform that lowers, ensuring they can't retreat and cheese the fight. The unavoidable pick-up seems annoying (it's likely to be a design quirk that pops up in the "things mappers do that annoy you" thread), but it's actually a good thing because 1) as a mapper we can ensure the player is entering into the battle maxed out at 200/200, and 2) the player won't care about not being able to retreat after lowering the platform, since they have nothing to go back for. Combat-wise, there's a whole host of enemies we could put down into the arena to make the fight interesting (especially since the player is essentially dashing in "blind" in order to make it over the lowering platform), but this is merely an appetizer to the finale. Therefore, we want something that's engaging, but ultimately not that threatening. Aha! Arachnatrons! The width of the arena lends well to having the streams follow the player, but the presence of the corner pillars will allow our flanked player to catch their breath (provided they can eradicate the nearby arachnatron stationed at each spot). This does something really important too: it teaches the player where the cover is, which is information that'll be required for the final battle. Had we used imps, demons, hell knights, cacos, etc, the player wouldn't need to care about cover, since they have enough room to strafe any oncoming projectiles (though revs & mancs would fulfill the arachnatron role). For our ammunition we'll scatter boxes of rockets around the arena, since 1) we know the player is entering this fight with at least the rocket launcher, and 2) the ammo provided here needs to carry the player through a majority of the final encounter, since they'll be using this floor space for that battle as well. Plus, rocket launcher battles are quite rare to encounter and yet always fun. Now, for our final battle, we have a major problem—any enemy that emerges from the room to the north can be suppressed by the player. Doomguy is a veritable one-man artillery unit: he can easily stand at the back of the room and blast away at his problems, unless he's under an immediate threat to move. This arena is practically screaming to have an AV in it (since the dash to cover would fill the player with anxiety), so let's place one behind the door to immediately spook the player. But... if we do that, we have two problems! 1) The player with the optional BFG is going to trivialize this surprise, and 2) the run up to the door has no cover for the player to use at all, meaning if they react too late they'll either have to hop into the lava or eat the blast. That seems pretty cheap, yeah? So let's throw in another surprise for the player. Crossing over this line opens the door before the player gets to it, starting the final battle before they are ready. So the player walks over it and boom, out comes an angry archvile!... but is that enough? If we playtest it at this stage, the AV feels too naked on his lonesome, being fairly easy to take down with the mountain of rockets we've handed the player. Thus, he needs a bit of backup. The problem is, whom to choose? There's a lot of options we can go with, but the most important thing to remember about equipping an AV with an enemy squad is that he's fast. The little bugger is great at resurrecting fallen foes but when we have him at one end and the player at the other, the AV is going to outrun his friends and make himself an open target. There's a couple things we can do to remedy this: change priority for the player by throwing in some chaingunners or a pain elemental, or team him up with a monster that's nearly as fast as he is: revenants. Now with revenants by his side, the arena becomes considerably more dangerous, especially since cover is sparse and small. This combination works great once the battle gets started, but we still have to get the enemies out of the exit room down into our deadly arena without the player destroying most of them. We could potentially fill the room up with so many enemies that the player couldn't kill them all before they flood the arena, but let's be more frugal about our monster placement: what is the one enemy the player can't simply BFG into dust? That's right—the cyberdemon! Technically the player can kill the cyberdemon with two well-placed BFG blasts, but all we need him to do is push the player backwards so his allies can join the fray. If we playtest this though, we find an unintentional snag: the AV frequently finds himself getting blasted by our cyberdemon (ah, the perils of making all the enemies approach from one direction!) There's really not that much we can do about this, since the AV is going to run ahead of the cyberdemon any time the big bruiser stops to shoot. So to fix our issue, we're going to have to think outside of the box: we need the cyberdemon to be inside of the arena as soon as the door opens, ergo, we need to teleport him instantly. As soon as he wakes up he'll move southward towards the player, so we'll throw a big teleport line across his feet. We don't want to teleport him too far, mind you: our goal is to have him surprise the player and push them backwards, rather than murder them point-blank or block their retreat. So now the door opens, the cyber groans, teleports, and the AV & revvies run forward to join the skirmish. However as soon as the AV is dead, the fight loses a bit of its luster, especially since the cyber is prone to infighting with the revs (which isn't a bad thing either; we don't want the player to ever have to duel a cyber for too long). To extend the longevity of the AV we'll throw a couple specters in to soak up the initial volley of rockets. You might be thinking "but dobu! Aren't AVs faster than pinkies?" and you are right, but as soon as the archvile starts casting his attack the specters should be able to adequately get in between the player's rockets and his golden ass. Not only that, but we'll throw some in between the revs and the AV, just to make sure no rev rockets annoy the archvile. This still isn't enough, at least for my tastes; remember how I said chaingunners or a pain elemental would divert the player's attention? Let's throw in a PE for fun. Rather than continue to clutter up the exit room with monsters, let's teleport in the PE (and a few cacos) to the south, behind the player. That way even if the player gets lucky and blows up our precious archvile, they'll have to split their attention between the rev rockets to the north and some slowly approaching balloons to the south. The fliers are especially useful too since they can openly assault the player if they spend a little too much time behind cover. And lastly, because I'm a jerk and I really don't like finales being lackluster, let's throw another archvile aaalllll the way in the back, so that by the time the player is giddy over having neutralized the first one, the second shows up to rain on their parade. This way the cacos & PE become even more of a hassle during the battle, and if the cyberdemon is busy infighting with the revs, we offer more than enough targets for the player to engage with so that the fight never becomes boring, even when you know what's coming. Before we wipe our hands of this encounter, we need to consider two more things: firstly, what about health and ammo? The initial arachnatron bout is actually fairly tame in playtesting so we don't really need to place stimpacks/medikits around the arena (plus all of our attackers pack such a powerful punch that the difference between 100 health and 50 is negligible). For ammo, we've given the player more than enough rockets to handle the fight, but it's likely that they won't want to use the RL to take down the surviving cyber, so let's give the player two of the optional weapons found earlier in the map (SSG & PG), as well as 200 cell for clean-up purposes. Since we really don't want to trivialize the work the player might've put in to find those optional weapons, we'll place the two weapons right next to the door so it'll be nearly impossible to grab them until most of the battle is over. That way we can also challenge the player that comes into the fight with the BFG, but is lacking the sufficient cell to use it. The second thing we need to consider is one of the most important things in all of Doom mapping: difficulty levels! This fight can be really aggressive your first time on Ultra-Violence, so let's take a look at what we can do to alleviate the player's woes on lower difficulties. For the first battle, if we remove two arachnatrons the fight becomes easy enough for anyone to endure, but which two do we erase? For HMP we'll erase the northernmost arachs (which will ensure the player cover if they move to the top of the arena), and for HNTR we'll remove the bottom two arachnatrons so the player can get into cover as soon as they step into the arena. For the second fight there's considerably more variables, and I won't go over them all since this post is already long enough as is. The general gist is that we remove the second AV for HMP and both AVs for HNTR, as well as a number of revs depending on the difficulty. We also reduce the threat of the flying enemies behind the player so that they can feel pressured without actually being in danger (like changing a caco to a lost soul), and finally, we move the cell packs next to cover on HNTR so they player will have plenty of BFG ammo. Click here to see the battle in action And that's it! It seems like a lot but the more you map the more intuitive the enemy placement is, and it's not like you need to rigorously write out what each and every enemy is going to do. And note that this isn't the "most optimal" enemy placement either; this is just what my mind came up with while fiddling with this little area. 16 Share this post Link to post
Steve D Posted August 7, 2017 @dobu gabu maru That was a great read. Lots to ponder, and a very good insight into your way of creating fights that typically rip me to pieces. ;) I had a lot of fun in that battle, even though I was able to cheese the start a bit. Even so, it definitely got my heart pounding! 0 Share this post Link to post
Optimus Posted August 7, 2017 (edited) Great thread! One of the things I want to get better at is proper texture usage, I mean how some texture combination make a much better overall picture, for example I didn't thought about that concept of darker ceiling/brighter floor textures mentioned in this thread. And indeed it shows. Usually, I spend a lot of undecided time wondering what texture to use and end up either using the same combinations or putting one just to finish off. I would also like to experiment with more unique combinations but it's always putting me into undecisive mode, scrolling through textures till it looks ok. My other issue is balance. As I am more interested to design 3d spaces, I don't give much thought, in monsters/ammo placement maybe. I do like placing monsters hidden for an ambush and such, but then the ammo/health comes as an afterthought and I just try to add enough. Usually you find conflicting reviews even in some good maps, where people are either complaining about too much ammo, or too little ammo, boring monsters or too difficult monsters. I guess you can't please everyone. But I am wondering how do you tackle this issue? p.s. Ok, I just saw the big wall of text above after posting this, I will read that :) 1 Share this post Link to post
Ichor Posted August 8, 2017 51 minutes ago, Soundblock said: Don't listen to any advice. Even your advice? 3 Share this post Link to post
Khorus Posted August 8, 2017 Don't feel like you have to separate each "room" with a door, they slow down movement for both player and monster. Thinking of ways to meld areas together can improve the flow of a map. My last map is an ~hour long adventure and the only doors are key bars. 2 Share this post Link to post
Skeletonpatch Posted August 8, 2017 I've been making maps for several years now. I have never published any of my maps, primarily because I don't want to simply publish single map PWADs and also because I don't think my maps are very balanced. One thing I can say though, DO NOT MAKE MAPS TOO LARGE! I once made a map that tried to combine four types of environments into one singular map. It started with a very linear outdoor area where you travel along a river, then you entered a techbase where I tried to make a less-linear experience before entering a stupidly dark cave that ended with a neat little demon temple. The last section of the level is probably the best part of the level once you get out of the darkness... I would often take long breaks from map making before returning to this map and trying to make "improvements", most of which equated to unnecessary detail in the environment. I have always struggled with item and monster placement in all of my maps, I can never find the right balance. Not to mention that the massive size of the resulting map caused nodebuilder issues. In all of my more recent maps I try to keep things more simple while also trying to make visually and stylistically impressive environments. One of these maps is set primarily in an outdoor area with various obvious points of progression all within the opening area's view. There are three locations, a small encampment, a castle and a tower. There are several invisible walls that allow the player to see enemies without being able to fight them yet as they are intended for later (now if only I could figure out how to make instant-lower platforms so that you don't need to wait for an invisible wall to slowly lower from the skybox once you've made it that far...). I also tried experimenting with sort of "mini boss" monsters that will teleport across the map after certain points of progression, though some of the monsters I want to use refuse to fit no matter how much I adjust the teleports! I think this map has a cool layout, it just needs better monster and item placements... 0 Share this post Link to post
Empyre Posted August 9, 2017 (edited) 3 hours ago, Skeletonpatch said: if only I could figure out how to make instant-lower platforms so that you don't need to wait for an invisible wall to slowly lower Make 2 adjacent sectors out in the void. Select the platform you want to lower first and then one of the sectors you just made and join them together. Set the ceiling height of the other new sector equal to the height you want the floor to lower, and then use an action to raise the floor to the lowest ceiling, and the floor will lower instantly. 1 Share this post Link to post
Skeletonpatch Posted August 11, 2017 On 2017-08-08 at 6:04 PM, Empyre said: Make 2 adjacent sectors out in the void. Select the platform you want to lower first and then one of the sectors you just made and join them together. Set the ceiling height of the other new sector equal to the height you want the floor to lower, and then use an action to raise the floor to the lowest ceiling, and the floor will lower instantly. What exactly do you mean by "join them together"? Do you mean make them the same tag or literally make the map interpret them as the same sector? Also, what I'm trying to do is make something similar to the map from Final Doom where you start in a room and can see a bunch of Arch Viles in a cage, with something blocking the door (though not the switch itself like in that map, more like a set of bars while the switch is somewhere else in the room and doesn't lower itself). Though now that I think about it I could probably just open the map I'm taking some inspiration from in GZDoom Builder and see how they did it there... Okay, after looking at it I can see that they do in fact make them the same sector, which I do not know how to do short of literally "pinching off" part of the sector. Is there a better way than that? Because that isn't entirely possible in my map without redrawing large parts of it. And don't worry, I'm not making a maze map with Arch Viles, I'm just trying to find a clever way of having a set of mini bosses in a level. 0 Share this post Link to post
Empyre Posted August 11, 2017 In Doom Builder, select the sectors you want to join, and then press the J key, and they will become one sector, with all the attributes (height, texture, tag, etc) of the first sector selected. 2 Share this post Link to post
Skeletonpatch Posted August 11, 2017 1 hour ago, Empyre said: In Doom Builder, select the sectors you want to join, and then press the J key, and they will become one sector, with all the attributes (height, texture, tag, etc) of the first sector selected. Thank you for the tip! After closer examination of MAP11 of Plutonia, I noticed that the invisible wall does not seem to possess a floor or ceiling on its own (or at least it does not appear when selected)... And I'm still not able to accomplish what I want... Is there some sort of tutorial for this type of thing somewhere? That would be extremely helpful! 0 Share this post Link to post
Memfis Posted August 12, 2017 If you want to have a fan in Russia, make sure that your maps can be enjoyed in many different ways. Let the player be hyper aggressive when he wants to, but allow him to camp as much as he wants if that is his preference. Lock in traps often make levels clearly unplayable in Nightmare or even simply with fastmonsters, which is a no no. You also want to avoid tight corridors with lots of monsters in them as that can force the player to shoot at them, therefore making his pacifist attempt invalid. Chainsaw and berserk are very good to have: after all, some people don't use weapon slots higher than 2. Naturally there should be some choices for people to make, and it's nice when some choices make things harder than other so that the difficulty can be sort of adjusted on the go. Generally, lean towards lower difficulty. An easy map can be made hard with addition of special rules or just by being reckless enough. A hard map is simply hard and there is not much interesting stuff you can do with it. 4 Share this post Link to post
Empyre Posted August 13, 2017 On 8/11/2017 at 6:33 PM, Skeletonpatch said: Thank you for the tip! After closer examination of MAP11 of Plutonia, I noticed that the invisible wall does not seem to possess a floor or ceiling on its own (or at least it does not appear when selected)... And I'm still not able to accomplish what I want... Is there some sort of tutorial for this type of thing somewhere? That would be extremely helpful! Here's a quick tutorial, then. I attached a little wad that demonstrates what to do in 3 steps: emptut1.zip In step 1, on the left, you make your invisible wall. Make both the back and front sides of all the lines point to the invisible wall sector. Make sure none of the lines are 1-sided. Bring the floor up to the ceiling, and leave the lines with no textures. I added the red line on the floor so you can see where the invisible wall is in this demo. In step 2, in the middle, make 2 sectors out in the void. Join the invisible wall to one of the new sectors, and make the ceiling of the other sector equal to the height you want the floor to lower, 0 in this example. In step 3, on the right, make a switch or some other trigger and have it raise the invisible wall to the lowest ceiling. Because the lowest ceiling is lower than the affected floor, instead or raising slowly, the floor will lower instantly. 1 Share this post Link to post
Koko Ricky Posted August 14, 2017 Step away from a map in progress and come back to it after a few weeks or even longer. You'll temporarily forget a few of the things you implemented and upon testing it, it will feel a bit more like someone booting up the level for the first time. It's in these moments that you'll learn a lot more about your aesthetic, pacing, combat, etc., than you will during the actual mapping process. 3 Share this post Link to post
Spectre01 Posted August 15, 2017 @Memfis That's an interesting perspective but also a lot of extra mapping and testing effort to accommodate niche play styles. When you think about how many people actually play your map and then narrow it down to those who liked it enough to replay/speedrun, it doesn't seem worth it. I'll throw out another tip that I need to start following too. If you're making a hard map, include extra resources and keep the difficulty moderate while you test. Then once you're happy with how the map feels, you can start removing resources and adding extra enemies for UV purposes. This also has the added benefit of having lower difficulties implemented and fun to play. 1 Share this post Link to post
Skeletonpatch Posted August 16, 2017 On 2017-08-12 at 9:39 PM, Empyre said: [Very useful info here] Thank you! I've managed to make all but ONE of the instant-lower platforms work properly... However the one that doesn't work is the first one you encounter that is supposed to release the "mini boss" demons from the starting area into their holding pen. Which is pretty vital for what I want to accomplish in this map... I'll keep tinkering with it and hopefully it works sooner or later. Since I've cluttered this thread with my own personal mapping questions, I'll try to offer some advise that is on topic. It's probably been said before (I think I may have said this earlier in the thread myself but I'm not going to check), but do not try to make overly detailed environments for no reason. I ruined one of my favorite custom maps doing this, all it did was break up the flow of the map, clutter the screen and overload the node builder because there were to many sectors and linedefs than it could handle. I've learned that it isn't hard to make visually interesting environments without having too many little details. The only time you'd want to have little details is if you were trying to make realistic environments that could appear to be functional in the sense that things look like they have a real-world purpose. The best examples I can come up with are Psychophobia and the Brutal Doom Hell on Earth Starter Pack. But in that case you probably aren't going for a vanilla mapset. 0 Share this post Link to post
Kyka Posted August 17, 2017 (edited) I don't have anything massive to add, except to say that a map does not have to be consistent with the real world design 'rules', but it must be internally consistent to its own 'rules', and those rules must be based on something recognizable to the player. One example of this is in modern games (yes CoD I am looking at you), is where the player can climb over one waist high wall, but not another identical waist high wall, as this second hypothetical waist high wall forms a 'boundary' to the level, and the first forms merely an obstacle to use as temporary cover. Frustrating to say the least. On another note, there has been very little discussion in this thread (aside from dobu gabu maru's pretty neat post on that level from Revilution,) on how to use monsters well. I would like to see some posts on monster flow/pacing, as thus far in my non existent mapping 'career', this is my weakest area. Hitscanners vs projectile baddies, how to use monsters so they create a threat without having that threat become overly frustrating, how to place monsters so the gameplay has this quality of 'flow.' I understand that monster placement can be used to create a very real sense of progression, over and above the obvious "small monsters first, big monsters last, then bossfight hurr durr," but how exactly to execute this? Also, how to limit/balance health and ammo in a way that challenges without causing the player to ragequit? Great thread tho. Edited August 17, 2017 by bLOCKbOYgAMES 2 Share this post Link to post
Spectre01 Posted August 17, 2017 As far as health/ammo balance goes, playtesting is probably still the best way to judge it. Play through your map a few times and see how many unused resources are left over. Then, remove some health/ammo depending on how strict you want the map to be. 1 Share this post Link to post