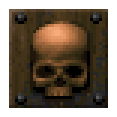
Obsidian Posted March 11 For those not in the know, composite textures are textures made up of several disparate graphics known as patches: the original Doom games frequently used this method of texture creation due to its ability to save disk space, but it also allowed them to combine patches in multiple creative ways. The practice is seen far less frequently in this day and age, but if you want to give your maps a bit of alternative flair you can consider this tutorial my recommendation to do so. Bear in mind that you'll need to have some rudimentary SLADE knowledge in order to do this: if you don't, this is the place you're looking for. Step 1. Open your project in SLADE. For this example I'm using my RAMP 2023 submission, as it has a handful of composites I made using Doom 2 patches that I'll be recreating for this tutorial. Spoiler Step 2. Click the TEXTUREx lump in your wad and then click Edit Textures. Spoiler Step 3. Welcome to the Texture Editor! Click the New Texture button in the left column of icons. Spoiler Once you do that, a window will pop up prompting you to name your new texture and specify its dimensions, which in this example will be 256x128. You'll also see a prompt asking if you want to start with a patch already present in the PNAMES lump or if you just want a blank texture: for the sake of simplicity, we'll go with the Blank option. Spoiler Step 4. Your brand new texture will be at the bottom of the list. Click on it, then click the Add Patch button on the far right column of icons. Spoiler Step 5. Now here's where the magic happens. Pressing that button will bring up a window showing all of the defined patches in your wad: you can browse manually to see what takes your fancy or look for specific patches using the Filter in the top right. For this example I'm going to make a wooden wall with some skulls adorning it, which first requires me to find WALL40_2. Spoiler As you can see the patch has been added to the texture with its X and Y properties at 0. Now we need to get WALL40_1: for the sake of texture consistency, we want this new texture to look like a variant of the stock texture that also uses these patches. Spoiler This patch will also be placed at 0,0 (and will also cover the first patch), so go to the X Position and type in 128. Spoiler Step 6. Now for skulls, four of them! Go back to Add Patch and this time look for SW2_2. Spoiler Once it's in, change its X position to 21 and its Y position to 19: these particular numbers are the result of me calculating how to evenly space the skulls across the texture. Spoiler Now, go to the column of icons on the right and click Duplicate Patch: this will make a copy of SW2_2, 8 pixels down and to the right of the original. Click on that new patch and place it at 85, 83. Spoiler Duplicate the patch two more times, placing the third and fourth skull patches at 149,19 and 213,83 respectively. Congrats, you now have a suitably spooky piece of wooden wall! Spoiler Notes The order of the patches in the list on the right corresponds to which patches are on top of others, with the bottom one being on top of everything else. Experiment with layering and partially concealing patches to get some fun results! I think the Scale option in the Texture Properties is ZDoom/GZDoom-exclusive? I haven't tested, but I've also seen no non-ZDoom projects utilizing it, sooooo... While you can be fairly free with patch placement in your textures, there does exist a bug that makes the game completely ignore negative Y positions: any patches that have them will have their Y positions set to 0 ingame. If you're mapping for vanilla, textures with more than one patch will crash vanilla if you use them as midtextures. And that's about all I got. You can make some pretty fun things with a few patches and some creativity and, rare as they are, there do exist some texture packs out there with new patches for you to toy with. Go wild! 8 Share this post Link to post
Obsidian Posted March 11 And just for shits and giggles, here's some more of the composites that I made for my RAMP map: some for utility, some slightly less so. Spoiler 2 Share this post Link to post
aRottenKomquat Posted March 20 Yes, this is very useful and not talked about much. I used this recently to add stock vine texture overlays on a few stock door/wall textures, and to create some new switch types. Really easy way to add simple things like that without having to actually deal with graphics programs and import new textures. 0 Share this post Link to post