

Book Lord
-
Content count
956 -
Joined
-
Last visited
9 Followers


Recent Profile Visitors


-
I C H I N I C H I (32-map megawad)
Book Lord replied to TheMightyWhoosh's topic in Map Releases & Development
Congratulations! It's great that you finally released this! I'll be playing your new creation as soon as possible, screenshots are intriguing, I'm very interested in how your gameplay creativity has evolved since KindA. -
The DWmegawad Club plays: Plutonia Revisited Community Project 2
Book Lord replied to dobu gabu maru's topic in WAD Discussion
I did not vote because I will not take part in the next month's playthrough. I am a little burned out and feel my writings this month have been harsh enough to annoy some mappers, but not really on point to spark any kind of useful discussion. My apologies to @waverider, @Gardevoir and @tatsurd-cacocaco, whose great work I have excessively criticized. I am taking a month off as a minimum, I did not even want to post the recap but since it has been ready for 10 days, I just drop it. See you in the future. Final Thoughts As a Doomer who enjoys adventure maps with good atmosphere and a story to tell while you are killing legions of hellspawn, I favour the TNT: Evilution approach over The Plutonia Experiment and its efficient combat routine. According to the preferences in new and old surveys, the legacy of Dario and Milo Casali lives on, and their masterpiece is still the most beloved IWAD in the community. I recognise the stronger influence of Final Doom’s hardest half, but despite its popularity it received only one acknowledged sequel in 27 years, Plutonia 2, developed by a restricted team of mappers that took eight years to get it out of the oven. In 2011 Josh Sealy @Joshy led the first organised community project, with the declared intent to be open to all contributors that wanted to homage and recreate the maps from the IWAD. It is amazing how an apparently clear task led to many different interpretations. Plutonia: Revisited Community Project (PRCP) involved approaches à la Wonderful Doom and attempts to be extremely innovative, serviceable bread-and-butter maps and magnum opus syndrome at its highest. Joshy launched the sequel PRCP 2 in February 2021 to provide a good home for the rejects of the ongoing Plutonia 3 project, and to give newbies and veterans equal chances to create Plutonia-styled maps with a custom resource pack, consisting of textures from the first PRCP and a few new ones credited to Fuzzball. It reached 32-map status in early 2022, it was released on idgames in August, and unlike its predecessor it received only an honourable mention at the Cacoward ceremony of the same year. Mapping standards and priorities have changed in 11 years, along with the community output that grew more than the number of awards. The DWMC July playthrough was a good opportunity to play the whole product and understand why it was not rated among the top releases of 2022. After reading the announcement by the project leader and the flexible standards he set, I expected this megaWAD to have a consistent quality and at the same time to be a mixed bag: a few authors stuck to the Casali formula and tried to emulate it faithfully, others took inspiration from either Plutonia 2 or PRCP, and a third category of mappers sneaked in their ambitious works, trying to steal the show. I was not looking for levels comparable to the original Plutonia since community projects often replaced the devotion to the IWAD with the desire to surpass it, therefore they traditionally featured larger maps, greater detail, harder challenges, and bigger monster counts, eventually losing connection with the source material. My only hope was that the shortcomings of PRCP were known to the participants as they were to the project leader, who compiled a list of prescriptions aimed at preventing them. Sometimes history repeats itself: direct homages have been avoided, though PRCP 2 indeed suffered from snowballing map size and length in the second half. Looking at the list of contributors, featuring many Doomworld regulars and accomplished mappers, I noticed that only the project leader, Tatsurd-cacocaco and waverider were part of the original PRCP team. My first hypothesis was that most participants did not know PRCP and Plutonia 2 in enough detail to understand why Joshy gave these guidelines: “Try not to make large maps. It’s understandable that people are inclined to churn out their large magnum opus in community projects but we’d like for most maps to not be big, save for a few. Try for maps with less than 200 monsters if possible.” I changed my mind after playing the creations of the PRCP veterans, because they were the first and clearest transgressors with the biggest and longest maps of the set. Joshy was less involved with the editor, probably because he was busy with Plutonia 3 at the same time, so he helped Dutch Doomer revise one of his old levels to become the megaWAD’s Inception, then he gave himself free rein with the thematic diversion of MAP31, one of the most memorable creations of PRCP 2, but also one of the least fun to play on first attempt. Most of the levels were unfriendly to blind players, presenting situations that were difficult to read and sudden, lethal ambushes at the end of a long journey, consisting of tons of incidental combat. Most maps (including MAP22 and MAP24) would have been quite enjoyable as standalone, whereas they felt excessive, even unbearable, as consecutive chapters of a 32-map megaWAD. As per my habits, I played continuous on Ultra-Violence, with savegames mid-level (not during encounters to cheat the RNG or to facilitate anything) and using only the weapons provided in the map to get some pistol start sensations. I had no major problems figuring out where to go and how to obtain the necessary equipment in the first half of the megaWAD, but the second half gradually increased the challenge as the maps became bigger and bigger, while resources were rationed or unevenly distributed. The third episode distinguished itself for a strict approach to map exploration and encounters, bringing the Plutonia murdering spirit to the very extreme: a mistake in an unpredictable ambush might cost 20+ minutes of progression if playing saveless. Continuous play saved me from frustration because I could use the BFG in case of trouble, even if it was concealed or absent in the later maps. A notable difference with the first PRCP was the absence of a bespoke soundtrack. Custom MIDIs are plentiful these days and it was reasonable to let mappers choose what they see fit, but this brought excessive variety to the table. The music in the background was a medley of safe choices from Plutonia Midi pack and Plutonia 2 tracks, and borrowed the remaining pieces from the community and the internet. Curiously, only a few PRIMEVAL contributions had been reused here, accentuating the detachment from the first instalment of the series. A few of the music choices were inappropriate (1’25’’ Rise of the Triad midis for maps that last 1 hour) or deliberately irritating, restating what the gameplay already showed to the player. I know most people play pistol start these days, and the structure of a community megaWAD has changed from the continuous adventure to the compilation, with maps being loosely related among them. PRCP 2 notably lacks a central idea connecting the project, and the Plutonia inspiration seemed just an excuse to create large, detailed, and challenging Boom maps. Most authors did not want to use the resources from PLUTONIA.WAD, preferring custom textures that looked contemporary but also “generic”, and some levels even lacked the iconic exit portals. The submissions have been ordered to create a reasonable difficulty curve and to provide necessary breathers, though the experience of continuous play did not suit the megaWAD, which became exhausting in the second half. There is challenge, traps, and punishment embedded in the Plutonia gameplay, but the small scale determined the success of the Casali formula. Like its predecessors, PRCP 2 decided to amplify the scale and the complexity, resulting in a product that can be recommended to strong-willed and hardcore players, and not to ordinary Plutonia fans. Best maps: MAP 07 – Agarthan Anomaly by Captain Toenail MAP 11 – Plutonium Rust by Alexander S. "Eternal" MAP 12 – Close Encounters by Egg Boy MAP 20 – Calamity Valley by Yumheart Other standout maps: MAP 15 – Ironclad by Cheesewheel MAP 32 – Orestruck by Matt Powell "cannonball" MAP 17 – The Wolf Hour by Sincity2100 MAP 29 – Gehenna by Yumheart Special mentions maps: MAP 22 – Trickster's Lair by Jark MAP 24 – Deep in Naraka by Tatsuya Ito "Tatsurd-cacocaco" MAP 31 – Steel Mill Zone by Josh Sealy "Joshy" -
The DWmegawad Club plays: Plutonia Revisited Community Project 2
Book Lord replied to dobu gabu maru's topic in WAD Discussion
MAP 30 – Shattered Nightmare by @Death Bear DSDA-Doom v0.24.3, UV, Continuous, blind run w/saves Once again, Death Bear proved to be the jack-of-all-trades of community projects and the good guy who is always ready to give a hand. Taking over his shoulders the Icon of Sin of a long megaWAD like PRCP 2 is a proof of his goodwill and dedication, but also of his desire to always put himself to the test. Did he accomplish the impossible mission? Not quite, judging from the feedback he received from the community, and after playing the map I must agree. Shattered Nightmare is among his “least well-received maps for a community project”, and for a good reason since it was a chaotic endgame battle. Moreover, there were no cosmetic efforts to hide Romero’s Head: no Gatekeeper, no ZZFACE replacement, just a sequence of annoying timed lifts with Arch-Viles and dozens of enemies spawned per tic. Before entering the controversial Icon chamber, Doomguy must endure some preparatory battles. These setups had nothing to do with Plutonia or its sequels but were 100% Death Bear’s style. They started with a turbo-quick monster teleport in a small room filled with everything the player needed, and continued in a huge cavern where the author wanted the player to share his love for combat in open spaces. Killing the deployed monsters and collecting both RSK and BSK was easy, and the Cyberdemon appearing next to the door was a formality. The same could be said for Arch-Viles and Revenants in the blood-filled hallway leading to the YSK and its door. The Icon of Sin battle was another story. Nobody may stand a chance against the infinite hordes that appear in the large square cavern, unless he knows precisely how the Voodoo doll sequences work and what he is supposed to do. Doomguy must wait for some lifts to appear, kill the elevated Arch-Viles to the west and to the east, shoot the eye switches behind them, and wait for the central lift with a Cyberdemon to lower. The same lift must be taken to reach the height of the exposed Romero’s Head and shoot rockets at it. Easier said than done, with six monster spawners dropping new enemies like rain. I used mid-fight saves and for the last dash I even used IDDQD, because there were too many Pain Elementals. I liked the weird looks of these caverns, but I could not stop myself from thinking that the ceiling seemed covered with enormous beef steaks, a nightmare you may have when you eat too much red meat. You did your best Death Bear, but this variation on the traditional Doom endgame unfortunately featured some of the typical problems, along with brand new ones. -
The DWmegawad Club plays: Plutonia Revisited Community Project 2
Book Lord replied to dobu gabu maru's topic in WAD Discussion
MAP 29 – Gehenna by @Yumheart DSDA-Doom v0.24.3, UV, Continuous, blind run w/saves After being mistreated and bored to death by the long maps of the third episode, Yumheart came to the rescue with a tough but somehow refreshing map. Gehenna is used in the New Testament as a synonym for hell, but the origin of the name is peculiar. It was the name of a river valley in Jerusalem’s outskirts, where the inhabitants used to dispose of the urban waste by burning it in great fires. Doomguy might follow the same fate of the damned if he does not watch his step, because the whole level is surrounded by a lake of lava with only a few teleport pads to get out. The delayed hot start was comparable in intensity to MAP19, but this time there was no place to hide or escape to. The only option was to kill the Chaingunners before they filled me with lead, and then concentrate on the mid-tiers that were so reluctant to infight. The YSK was there for the taking, but you ought to find better weapons before stirring a hornet’s nest of Pain Elementals, Cacodemons, and Mancubi. The rocket launcher was on top of the stairs, guarded by a Chaingunner ambush like almost everything in this level. After circumnavigating the imposing structure, decorated with magic runes and dominated by a huge, inverted pyramid, I found a switch that raised a bridge to the plasma rifle in the starting area. Nothing is for free in Gehenna, so be careful. Armed to the teeth, I triggered the YSK ambush and disposed of the assailants. I noticed that the RSK lay just below the pyramid in a central courtyard, but I took my time and found a secret backpack on the ramparts. The Soul Sphere and the surreal cityscape were destined to remain secret, because the trigger was so hidden that only an editor could show me its location. The one-way path around the structure was a bit aggravating since it forced me to travel through previously cleared areas, attacked by a Cyberdemon. The battle at the centre of the map was the best in store, starting with a single Arch-Vile accompanied by Demons, Imps, and Hell Nobles, and ended with two surprise healers that joined the fray when I was relishing my victory. The keys were used on the corresponding switches and activated the final battle, beginning with a void red-carpet walk granting a BFG, followed by the Cyberdemon telefrag and a Radiation Suit. Doomguy and a legion of demons were suddenly thrown “into the blazing furnace, where there will be weeping and gnashing of teeth”. The lake of lava surrounding the playing zone was quite large to comfortably run and hurl BFG balls to great effect, but you need to manage your shielding suits to survive. The green haze impaired my view to the point I could not see rockets, and the sheer number of Pain Elementals generated a grainy cloud of flaming skulls that scattered in all directions. The fight was more annoying than difficult, and I died a couple of times because I did not see a rocket coming at me from miles away. At some point, the entrance became accessible, and I noticed there was only a single stimpack left in the whole map! Gehenna was the best-balanced level in the third episode, showing how to pose a challenge without lasting 30+ minutes and wearing the player out. I wish more authors had chosen this approach for PRCP 2. -
The DWmegawad Club plays: Plutonia Revisited Community Project 2
Book Lord replied to dobu gabu maru's topic in WAD Discussion
MAP 28 – Crimson Realm by Mattias Johansson @waverider DSDA-Doom v0.24.3, UV, Continuous, blind run w/saves When I saw the name of waverider among the authors of this megaWAD, featuring in a traditionally heated position like MAP28, I was very wary of entering Crimson Realm. The Doom veteran and former Team TNT member submitted Venom to the first PRCP, a map that I found mind-boggling and exhausting, and the difficult start of his latest contribution, taking place exactly after the cramped ordeal of Rules of Nature, was enough to make me close the book on PRCP 2 and take a four-day long break. Doomguy started in a medium-sized hall with active Chaingunners in the middle and dozens of enemies facing the opposite direction. The obvious challenge was to get out before they riddled me with bullets, but the exits had been purposely clogged with fatty hellspawn. The trick was to cause animosity between different breeds, dislodge the Mancubi from the doorways, and leave. The situation in the outer courtyard was not better, with many other enemies being alerted and Arch-Viles negating much of the area. The rocket launcher and the plasma rifle were right there, and once I put my hands on them I could easily clear every monster in the starting area and was settled for 90% of the map. After the hot start, despite swallowing about 50 minutes of my life for 36 minutes of actual gameplay, Crimson Realm became a largely futile Doom level, following the worst practice of sprawling layouts, consisting of chamber after chamber of opposition to clear. The long path to the BSK was just an exercise in killing monsters in front of you and checking niches for barely visible Chaingunners. I noticed my shells and bullets were dropping constantly, suggesting that the intended way was to speedrun these encounters with heavier weapons. Have fun with that, but on first playthrough I tend to proceed cautiously, and I found nothing except time-consuming encounters until I arrived in front of the blue bars. The teleport ambush with an Arch-Vile and Revenants from behind was a good wake-up call, instantly raising the attention level, and it lasted for the upcoming RSK ambush, which was similar and expected. The red door was not far, but it only contained a Cyberdemon to kill blind players that do not expect a rocket when opening a door. To proceed further, the player must search for a switch in the south-western cave, wasting more time with dull combat. The yellow door seemed directly connected to the exit seen before, and the YSK was just at the end of a hallway, what could go wrong? Regardless of the time a player had spent so far in Crimson Realm, waverider was determined to end their run so close to the finish line. The ambush in the YSK corridor used an Arch-Vile, Mancubi, Revenants, and Hell Nobles in a very narrow space with almost no cover. Normal players like me cannot survive it without a BFG, and exceptional luck is required in any case (I watched tatsurd-cacocaco’s video: it is incredible that nobody attacked while he turned his back to Mancubi and AV). Things were about to get even worse in the large cavern outside: pistol starters must cope with a chaotic slaughter without a BFG and with insufficient health pickups, unless they keep calm and find the secret Soul Sphere while the battle rages on. I am not fond of maps lasting this long and wanting to murder the player at the end. Figuring out how to start was ok, the course of the map had few surprises in store, and I just BFG’d my way through the last big battle. I am surely not returning to Crimson Realm anytime soon. -
The DWmegawad Club plays: Plutonia Revisited Community Project 2
Book Lord replied to dobu gabu maru's topic in WAD Discussion
MAP 27 – Rules of Nature by Potatoboih DSDA-Doom v0.24.3, UV, Continuous, blind run w/saves Who on earth is Potatoboih? Never heard this name before, and if my research is correct, it is the pseudonym for a community veteran known as @Gardevoir. Anyway, after playing this map I will surely remember his various nicknames, so I could save myself from another miserable experience. I played his magnum opus Rules of Nature until I reached the end that also marked the end of my tether, and I needed a four-day rest before I found the motivation to resume my PRCP 2 playthrough. Rules of Nature received a lot of attention in the visual department, and it was very difficult to find an area that was not charming or even stunningly beautiful, thanks to the decorative detail and special sector props, with corrupted trees being the most memorable ones. Conversely, lighting was not particularly accurate, it just respected the natural difference between indoor and outdoor areas. Except for the “corrupted nature” theme, the level did not follow a narrative thread, taking the player from brown stone buildings to caverns, then inside the bowels of a possessed tree that grew underground, emerging on top of a marble tower, and returning to the quasi tech-base hub where everything started. The environment was designed for the eye candy, and it could have been one of my favourite levels if it was not for the terrible gameplay. Everything in this map had to be earned at a high price: weapons, keys, and obviously the ticket to MAP28. It started in an open hub with dozens of snipers and basically no cover, so the only viable method was to run like a headless chicken and gradually eliminate the weakest foes. The necessary weapons were far away, and only the plasma rifle was accessible in a trapped shrine on top of a hill. Arch-Viles, Chaingunners, Revenants were ready to pop up on crucial moments, and they caused a lot of pain because my movement was always impaired. Rules of Nature was the reign of obstructive detail that propitiated every kind of annoyance, from hitscan attacks missing their target to Doomguy getting stuck on things or wall protrusions when least desired. SSG was in the western building along with the RSK, but do not unleash the Arch-Viles in the fire without collecting the other weapons! If you can beat the healer quartet and their sidekicks in such a cramped arena without a BFG (I could not), I am afraid that picking up the RSK that released more Arch-Viles and two Cyberdemons in the space of a living room will not turn out very good for you. I let them stay in the fire and ventured in the caverns to the south-east instead, more than certain I was taking an optional path which eventually revealed itself as normal progression. Monsters continued to pop-up without preambles, but I carried on until I finally found a rocket launcher. Picking it up released two Arch-Viles with so many other enemies around that they killed me on the spot, so I had to slowly wipe out everything in the area before approaching the coveted weapon. I jumped into the grotesque mouth of the demonic tree just to find another obnoxious setup: a battle against two Cyberdemons and Hell Nobles in the dark, meandering, and narrow stomach of the behemoth. If the player jumped down there before collecting the plasma rifle, he is doomed; if he has prescience of everything, he might find the secret BFG, but what time was given to the blind player? The whole map applied continuous backstabbing and aggression of the unfairest kind. I was shocked by the Arch-Viles resurrecting corpses of creatures I did not kill, then I learned through the editor that our meticulous author placed them there at the beginning of the level with a behind-the-scenes barrel & crusher combo. The welcome in the marble tower area was harsh as usual, whereas the BSK encounter was the only remotely fair thing I found in this map: just Hell Nobles to repel with rockets before they get too close. I did not find a single secret, as I was never in the mood for searching with frustration reaching unprecedented levels, comparable only to Hell Revealed played blind on UV -fast. Based on what I saw later the content of the secrets was very helpful, and they could be considered mandatory for pistol starters. The arena fight preceding the exit was presented in the usual irritating fashion, attacking Doomguy with every resource before he could assess the situation. Once figured out that the Arch-Vile must go first, the two Spiderdemons must infight to give you the time to kill Revenants and Chaingunners, and that no switches should be touched until everybody else was dead, the set piece could be beaten consistently and with some satisfaction, an emotion that rarely affected me during this playthrough. I felt tricked, strangled, deprived of my combat skills, forced to fight in tight spaces full of impediments, while the necessary resources were always elsewhere. In case it is not clear, I did not like Rules of Nature at all. -
The DWmegawad Club plays: Plutonia Revisited Community Project 2
Book Lord replied to dobu gabu maru's topic in WAD Discussion
MAP 26 – Golgotha by Devon Barnett @Χyzzy DSDA-Doom v0.24.3, UV, Continuous, blind run w/saves The second and sadly last “breather” map of the third episode, Golgotha was an economically designed map showing relentless aggression within a limited size. The start is a guaranteed death on first attempt, with an Arch-Vile and two Mancubi attacking from behind. Infighting helped sorting out the situation and allowed me to carry on with the map’s ambushes. The choice to place the rocket launcher in a complicated secret, and to pair it with a major fight rewarding you with rockets and a Megasphere, was very weird. I left the map without discovering it, forfeiting completely the use of rockets. After killing a second Arch-Vile and several Arachnotrons, the western portion of the map led me to the YSK in two steps: firstly, I ascended a staircase killing Chaingunners and Arachnotrons, then the key disappeared under my nose and was apparently moved near the exit, while Revenants and Arch-Viles materialised amongst Commando corpses. The key was then used for the lion switch in front of the starting point, opening the exit guarded by a Cyberdemon and releasing an army of Mancubi, which were naturally supposed to infight. Behind the lineup of fatsos, a BFG was available to dispatch the survivors, but pistol starters have only one shot. I admired the taunting attitude of some tricks seen in Golgotha, especially in the YSK quest, but I did not like that 30% of its content was behind a secret. I cannot blame the author for his conciseness, as this megaWAD absolutely needed short maps like this. -
The DWmegawad Club plays: Plutonia Revisited Community Project 2
Book Lord replied to dobu gabu maru's topic in WAD Discussion
Now that you say, it is a bug that modern source ports have fixed by default and do not allow the user. I saw it more often when I used to play with Doomsday, but I am sure I saw ghosts monsters appear on DSDA Doom too. The bug might be hard-coded to reappear on maps that use it as a feature, which is not the case here. -
The DWmegawad Club plays: Plutonia Revisited Community Project 2
Book Lord replied to dobu gabu maru's topic in WAD Discussion
MAP 25 – Sting Operation by Sebastian Graham @General Rainbow Bacon DSDA-Doom v0.24.3, UV, Continuous, blind run w/saves General Rainbow Bacon did not know that his map would have followed Tatsuya’s behemoth, or he would have probably avoided a direct hot start with Imps, Sergeants, and Revenants in your face. On the other hand, Joshy knew we needed some sort of breather, and Sting Operation at least gave me some respite with its small size and monster count. The way he set up the aggression was brutal though, and traps were as lethal as you would expect from a Plutonia-inspired project. I picked up the SSG, used a switch just to see what it did (it crushed the Commandos in the nearby room), and killed the welcome committee. A short tour to the east led me through many dangers and into an Arch-Vile. I found the easy secret with lots of goodies, but I still felt I was lacking good weapons for the deployed enemies. When I triggered the RSK ambush, I found no way to keep the monsters at bay, so I made a rush for the red door hoping to find something useful. The rocket launcher was there and the burning inverted cross sent me into the crusher room to pick up the YSK and wake up two Arch-Viles. I am astonished that they did not resurrect ghost Chaingunners after that crusher trick, but they decided to attack me continuously and I kept them inside their room. I returned to the RSK zone to take care of the monsters I left behind, and I proceeded to the yellow door, missing the two-step ammo secret. The plasma rifle was immediately equipped, but I did not imagine that on top of the steep staircase a Baron of Hell was about to ridiculously pop-up in front of me. The situation must be sorted with cells and staying on top: I thought it was impossible at first, but with foreknowledge it was feasible. From the tower, I could kill the other monsters in the courtyard and even the reinforcements that appeared later. It could not be a map by General Rainbow Bacon without a cramped Cyberdemon fight, and that was exactly what awaited in the exit. Oh, and more pop-up Arch-Viles! Sting Operation relied extensively on Plutonia stock resources, which improved its visual fidelity to the alleged source of inspiration. The author aimed at recreating the experience of the IWAD more than outdoing it with additional detail, more monsters, or intricate Boom effects, and I had quite a good time despite the initial hardship. It was a good entry from a veteran mapper, with only a couple of flaws that are easily forgiven due to the compact size. -
The DWmegawad Club plays: Plutonia Revisited Community Project 2
Book Lord replied to dobu gabu maru's topic in WAD Discussion
MAP 24 – Deep in Naraka by Tatsuya Ito @tatsurd-cacocaco DSDA-Doom v0.24.3, UV, Continuous, blind run w/saves I remember Tatsuya Ito’s two contributions to PRCP as the most faithful revisitations of Plutonia levels, bordering on plagiarism for their affinity with Realm and The Twilight in both visuals, names, and main events. When I saw the opening shot, I thought this time he paid homage to Tombstone, but I was far from the truth. He was aware that he should change the formula adopted in the previous project, but he also wanted to honour the work of his favourite authors; eventually, the veteran speedrunner decided to make a tribute to many IWAD levels at the same time. Originally created for Plutonia 3, Deep in Naraka was by far the largest and most crowded map in PRCP 2, one that will surely impress for its content while requiring a lot of patience to get through. Naraka can be roughly described as a Buddhist equivalent of hell, situated deep below the human world in a series of caverns. I do not know what bad karma brought Doomguy to this place but be informed that lifetime in Naraka is usually eight times the lifetime in the previous world. How much did MAP23 take you to complete? I reached the exit after 1 hour of actual play time, without maxing out items and secrets. In this map nothing was optional or skippable: the author accurately designed its ambushes and puzzles and required me to visit every single place. While I did not feel most encounters to be that difficult, the excessive length drained my strength and attention failed me on more than one occasion. When the exit was revealed, a Cyberdemon popped-up on the bridge with a handful of Arch-Viles behind. Normally I would have broken through with the BFG, as the situation was not that difficult or RNG-dependant, but I was so tired that I let them kill me. Let us proceed in due order: after a quasi-hot start, the player might either go to the east, which is recommended to find the rocket launcher, or move northwards into a very large cavern with a labyrinth at the bottom floor, the exit in the middle, and ledges around the perimeter. A visual and technical highlight of Deep in Naraka, the cavern was used multiple times as a hub, connecting the map pieces and offering gameplay at different floor levels, ranging from a maze à la Hunted without Arch-Viles to hyper-vertical stuff comparable with The Final Frontier/Antichrist. At some point, columns with caged Revenants appeared to torment the player walking on the ledges, and it was an unexpected event. The BSK was found in the northern section, a poisonous blood treatment plant that reminded me a bit of The Sewers (Arachnotrons in the corners, Mancubi appearing in the middle of pools, a Baron guarding a switch). The infernal landscape seen from the windows occupied one third of the map’s total surface, and it was drawn just to complement the visuals. The ambush happening on the return path accelerated the pulse rate with a sudden change of environment: the BFG was given, but it was not necessary because making the various enemies infight with the Cyberdemon was more fun. I continued to the west into a section that called The Twilight to mind with its cages and pools of blood. I found myself in the wild RSK encounter by pure chance, as I was escaping from homing rockets. A large monster teleport took place in a chamber that reminded me of a specific area of Tombstone, but it was very far from the start, as if a smaller map with a coherent theme had been dismembered and extended to form this sprawling adventure. At this point, the map’s progression lost its logic and became needlessly confusing. In principle, the keys were not acquired to open doors, even though blue and yellow doors existed to act as “shortcuts” to the corresponding switches (in fact, the stairways contained lots of pointless combat). The colour-coded switches raised the matching bars in the level, so they were all required to reach the exit, except for the blue switch that was also mandatory to access the YSK section in the north-west, another blood sewer hybrid. That was the last section I visited, after going through the massive encounters in the eastern section unlocked by the RSK and inspired by The Living End, masking strangely familiar areas with views of special grandeur. Monster deployments were not as dangerous as they could have been, which was merciful considering that at this point I was more than fed up with Deep in Naraka. There was some very good stuff dispersed in its sprawling layout, but such a big map is simply intolerable in a megaWAD that can be played continuously. I need some fresh air. -
The DWmegawad Club plays: Plutonia Revisited Community Project 2
Book Lord replied to dobu gabu maru's topic in WAD Discussion
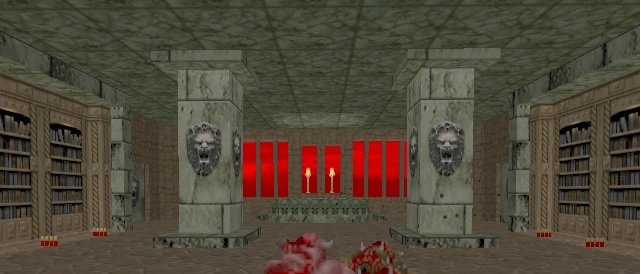
MAP 23 – Wrong Turn by @MattFright DSDA-Doom v0.24.3, UV, Continuous, blind run w/saves Flickering lights on a conveyor belt were the Boom way to introduce Wrong Turn, an atmospheric map by an author with not many official submissions under his belt. MattFright showed good ambition here, as the environment he depicted had something special: a blood swamp dotted with graves and maimed bodies, containing several man-made buildings now transformed into bastions of evil. The creepy flood had dragged off crates and pieces of equipment, which Doomguy must collect to get ready for the map’s challenges. The first couple of fights set up the standards: sudden pop-ups and teleport ambushes with Arch-Viles acting as threat propellant. That was not a bad idea per se, as they are very efficient Doom enemies; I only found that using them in every single fight was a bit repetitive. However, after acquiring the rocket launcher and revealing a blood-filled dale with a medieval gate structure at the other side, I was ambushed again while invisible Revenants shot homing rockets from two burning towers. My ammo reserve was constantly dropping since the beginning, and it soon became evident that Wrong Turn was not designed to methodically clear the opposition; I must only kill enough demons to quickly advance through the areas, but choosing where to go in a blind playthrough was not an easy task. Trap after trap, I emerged in a large outdoor area, shaped as a ring but not entirely accessible, with a cavern shortcut through the central hill, and Cyberdemons at my heels. I concluded that the resources did not allow to make a stand, so I rushed into the southern building where the rocket-shooting goats could not chase me. The inside was a mysterious and ornate library, swallowed by vegetation and decay, but still oozing forbidden magic and lore. The author already set things straight, so most of the Arch-Vile ambushes in that section were expected. I was only killed during the BFG encounter, because I was surprised by the Chaingunners warping in and I fell into the deadly embrace of healers and their bruiser friends. Emerging to the outside, I could climb on top of the bank where I saw the RSK. Picking it up triggered a large monster deployment in the area, which became a ring where running was not a problem, unless Arch-Viles get you with an unwarranted immolation from the distance. To prevent speedrunners from running to the red door, dispatching the Spider Mastermind with a BFG shot, and reaching the exit, bars were raised in front of the door and a visit to a dark cavern to the west was required. To max out the map, Revenants in the fiery towers must be killed manually, since a crusher was devised only for the reinforcements in their closet. That was a bit annoying, and I was not a fan of the gameplay enforced in Wrong Turn with ammo and weapons provided in small doses. The secret plasma rifle proved essential to simplify combat in the library, while the other secrets were irrelevant, especially the Computer Area Map that I found at the end of the level. Things and small solid obstacles sometimes interfered with movement, but I was fond of the texture and sector work performed by MattFright, and I even missed the secret dining room with its stunning sector artwork and Doomcute. Hiding this piece of work behind a timed door was a weird decision; blind players have no chance to find it and might not even know it existed. A potentially great map, it proposed something different but might be more enjoyable to other types of players. -
The DWmegawad Club plays: Plutonia Revisited Community Project 2
Book Lord replied to dobu gabu maru's topic in WAD Discussion
We are entering forbidden PRCP 2 territory now. Prepare to suffer a bit, or a lot... Continuous play will not help that much, blind pistol starting from now is bold to say the least. Playing without saves is not recommended, unless you can/want to spend a lot of time playing Doom. MAP 22 – Trickster's Lair by @Jark DSDA-Doom v0.24.3, UV, Continuous, blind run w/saves So, this is what happens when Jark wants to play tricks on the player! Trickster’s Lair was conceived to be mischievous, treacherous, unfair, and frustrating. A dungeon full of damaging blood, malicious ambushes, and deadly traps, designed to keep you on your toes for half an hour. The cacophonic soundtrack Carnage Cycle by Immorpher made the experience even more exhausting, as if the constant pressure, the on and off progression, and the rather unexpected traps were not enough. Just like me and Christopher Golden, Jark is obsessed with WOODGARG and her red eyes, as he hinted in his E2M6 of Solar Struggle. The sinister icon will haunt Doomguy and play countless dirty tricks on him during the whole map, starting aptly hot and mean with an Arch-Vile already conjuring fire, a damaging blood pit surrounded by enemies, an SSG, and only a hole to escape, if you notice it before being blasted to death. The situation at the bottom was not much different: Arch-Vile in a central cage like in any Dario Casali map with a pit, bad guys in all directions, Revenants, Chaingunners, a nightmare that required several tense minutes to sort out, scrambling in close quarters and asking myself where Jark hid all the weapons. Both plasma rifle and rocket launcher could be obtained in the south-western portion of the level, accessed either by going west or from the bottom of the blood pit, but not without struggle. The rocket launcher trap was particularly elaborate, with a surprise teleport line sending me in the middle of a pit, easy target for Hell Knights. The eastern part of the pit was dedicated to the level’s intricate progression, starting with a platform run through crushers that ended in a devious trap. An Arch-Vile was moved where he could find corpses to raise, creating a small army. The new path led to the RSK, but the first approach ended in a dangerous pit trap that it is very likely to kill unprepared Doomguys, Once out of the damaging blood, wooden pillars allowed me to reach a switch that raised an alternative bridge to the RSK. Unfortunately, I did not notice there was a second row of wooden pillars towards the south-eastern ledge, and this accident caused me a lot of headaches as I was unable to progress. Exploring the north-western portion of the level only plunged me into more traps, but the BSK was required to open the level exit. I even found a hidden yellow door, but I did not search for its key during the playthrough. Secrets were too cryptic and elaborate in Trickster’s Lair to be discovered on a blind first attempt, when the player is overwhelmed by sudden traps and a rather complex progression. When I finally entered the last portion of the map I was a bit exhausted; unfortunately, many ambushes, damaging floors, and timed lift puzzles awaited my discouraged computer self. A large blood pit, surrounded by walkways and overlooked by an Arch-Vile, must be traversed to reach the area with the BSK. I was low on rockets, since the map had been stingy with them, and when I saw the Cacoswarm I retreated inside the building, approaching a Megasphere and a switch. The Barons and the Revenant almost trapped me, but the worst problem came from the nth Arch-Vile arriving together with the Cacodemons. I eventually found the BSK, and near it I noticed Jark's mesmerising trick to hide and show a secret BFG. I failed to solve the puzzle with the remnants of my determination, I only wanted to leave and went for the exit. The last ambush almost succeeded at killing me, but there was a Soul Sphere to recover from the Chaingunners’ point-blank attack. It is very hard to enjoy a prolonged backstabbing session like Trickster’s Lair at first play, but the author did a good job at rejuvenating the Plutonia tropes by mixing them with clever trap design. It might have been more tolerable if the layout was smaller, or if the level was not part of a megaWAD already full of long, challenging maps. -
The DWmegawad Club plays: Plutonia Revisited Community Project 2
Book Lord replied to dobu gabu maru's topic in WAD Discussion
MAP 21 – Scorched Sacellum by @wydoomer DSDA-Doom v0.24.3, UV, Continuous, blind run w/saves A relative newcomer on the mapping scene, according to the Wiki Wydoomer contributed a total of three levels to community projects. While the visual theme of Scorched Sacellum was something I might have seen a hundred of times, it used some brown brick and rock textures that were exclusive to PRCP 2, looking nice when paired with bright lava floors and falls. The lava replaced the more typical contrast with the sky, which was barely visible in the central room of this underground complex. The Tyson start paired with hitscanners and barrel explosions was a good way to begin the third episode. The whole map established an entertaining routine of incidental combat and moderately dangerous ambushes, using slightly higher numbers than Plutonia but feeling closer to its original formula than what we had seen in the last 10 maps. The exit was behind a Boom triple key door in the starting room, and the obvious task was to find the skull keys by exploring the Scorched Sacellum and its lava-filled rooms, for which no Radiation Suit was available. The rocket launcher was granted for free and so were rockets, scattered throughout the level and constituting the primary offensive opportunity for Doomguy. A feature that I liked very much was the interconnected layout, with terraces and ledges connecting the various rooms and allowing the roaming monsters to appear and attack when not expected. I also liked the one-way escapable pit near the RSK, which forced me to find the key and trigger its ambush after falling inside. The Hell Knights and the Cacoswarm were stopped with a good investment of rockets, but I found myself pinned down at low health for a while. The BSK could just be taken by jumping on its pillar from above, and an Arch-Vile was exactly what the Casali doctor ordered. The way to the YSK was longer but not particularly difficult if approached carefully, and it ended with another Arch-Vile out of thin air (he actually came from a secret compartment behind a lava fall, containing a box of rockets). The YSK area also contained most of the map’s secrets, a good combination of obvious hints and keen eye requirements. The exit contained one last attempt at resistance, but the map was practically over. A bit of a breather in terms of pressure put on the player, Scorched Sacellum was a suitable map for a Plutonia-themed project, trying to present an updated version of the IWAD gameplay and visuals without going overboard with modern concepts and priorities. Thanks, wydoomer, for making this map, and thanks, Joshy, for placing it here. -
The DWmegawad Club plays: Plutonia Revisited Community Project 2
Book Lord replied to dobu gabu maru's topic in WAD Discussion
MAP 20 – Calamity Valley by @Yumheart DSDA-Doom v0.24.3, UV, Continuous, blind run w/saves Calamity Valley was the first map by Yumheart I have ever played, but it will not be the last since there is another one at the end of the third episode of PRCP 2. We are indeed far from anything seen in The Plutonia Experiment, since this entry was a showcase of modern design sensibilities, ranging from combat puzzles to compact slaughter gameplay. It started in a dark library full of spiders and with a rather uncommon Arch-Vile & Cacodemon ambush happening near the rocket launcher. The elevated Spiderdemon was a constant harassment and invited me to retreat deep inside the building. After collecting the SSG and seeing the plasma rifle tauntingly disappear, the non-blind player might choose to head westwards, where the map progression unfolds, or to stay a little bit inside the charmingly lit building to collect plasma weapons he will not find in the other path. Not knowing what lay ahead, I entered the northern chamber that slowly revealed itself as a vicious crusher trap. I must hit a series of switches that released enemies in the confined space and get out before the lowering ceiling squished everybody. The situation was not exactly easy to understand, as the crusher started immediately, and I waited several seconds before activating the closets. Moreover, a monster miraculously survived inside the room and could not be reached for 100% kills. Despite these problems, I liked the original design of this trap, taking full advantage of Boom's generalised crushers. Another optional part was the “secret” Cyberdemon BFG two-shot training centre. I suck at that practice, but gaining the weapon early on was worth fighting 7 of them in their private loft. There was nothing else to do in the library, so I moved in the direction of the titular Calamity Valley, getting ambushed by Revenants and Demons just before leaving. The valley was a large outdoor section with a few canyons to explore and titanic abstract structures in the background, ranging from ancient Roman arches to weird open-air bookshelves. The Cyberdemon on a pillar was a pain in the neck, and I recommend shooting at him as soon as possible, because he will teleport near the “hoi!” lava pool and stop attacking Doomguy wherever he goes. Watch out for the numerous snipers and an Arch-Vile ambush, and reaching the teleporter at the other side of the canyon will not be a problem. The three skull keys were found in the same terrace overlooking the Calamity Valley, each one on a pillar with a switch that released a different combination of monsters, acting either as shooting turrets or as ground forces. All the assortments provided a good challenge, but I found the BSK to be the hardest, with Mancubi as turrets and Revenants & Hell Knights on the floor. The return path to the library was enlivened by a monster teleport integrated by resurrected corpses, courtesy of two Arch-Viles, but the main slaughter set piece was about to take place in the starting area. The RSK unlocked some useful resources, while the BSK and the YSK must be used on the respective switches, unleashing about 40 Revenants, 6 Arch-Viles, the Spider Mastermind and a bunch of Hell Nobles in the area. The healers were the priority, so I assaulted their closet with the BFG trying to kill them quickly. I succeeded at the second attempt and had no problems cleaning the rest of the room afterwards. The Spiderdemon was stun-locked by a Revenant and killed with bare hands. I stand by my impression that it had nothing to do with Plutonia, but I acknowledge that Calamity Valley was a well-made Doom level with a good degree of originality, paired with streamlined combat design that kept the map’s duration around 20 minutes. A memorable work, worthy of its slot. -
The DWmegawad Club plays: Plutonia Revisited Community Project 2
Book Lord replied to dobu gabu maru's topic in WAD Discussion
MAP 19 – Acid Bath by @DukeOfDoom DSDA-Doom v0.24.3, UV, Continuous, blind run w/saves Well, that was a crazy hot start! The hostilities began instantly and with such an intensity that did not allow Doomguy to turn around. He started on a cross with many useful weapons that cannot be picked up, because too many hitscanners were ready to shoot on target. Pain Elementals will follow and fill the air with flaming skulls, and soon monsters will start teleporting on the central cross, using teleport pads that should be a player’s prerogative. There was no other choice but to take an Acid Bath in the green slime, revealing the greatest lie ever in a map title: not a single damaging floor could be found in this level! The only way out of the central pit was a blind jump in a hole; it was a good idea to shoot a couple of rockets in advance, since Imps were waiting at the bottom. The skull switch opened the whole map, exposing its corners and allowing to take out the distant snipers and find some respite. Most of the enemies guarding the keys could be sniped with impunity from the harmless floor, before venturing on the north-western ledge to collect the RK and to the red door at the centre to pick up the BK. No real threats were unleashed when taking the keys. There was more effort in the design and visual polish of the optional plasma rifle section to the west, where I was trapped and attacked by numerous monsters before being allowed to return to the cross-shaped ledge. The exit was in the south-western corner, but opening it required a trip to the north-east and then to the last platform that had not been visited yet. The double-face switch allowed me to collect the secret BFG, which came in handy only for the heavily trapped Soul Sphere secret. DukeofDoom put a lot of care in designing deadly ambushes in sections that were not mandatory, a bizarre approach if you ask me, but the hot start felt at home in a Plutonia-inspired community project, and I appreciated the clean visuals with interesting height variation. The lack of a proper Acid Bath was also a positive feature of the map, which I will record among the hits of the megaWAD.